Rebuilding A QA1 Circle Track Monotube Shock
Rebuilding a QA1 Circle Track Monotube Shock
If the time has come to rebuild your QA1 monotube shocks, it’s something that can be done in your own shop. However, there are a few extra tools that you’ll need that most common garages might not have. Let’s walk you through the process so you can see what it takes.
Tools Required
The most important thing you’ll need is a nitrogen tank (to be able to fill the shocks) along with the QA1 fill tool. You’ll also need a shock vise and a few other common tools.

Disassembly
After mounting the shock in the shock vise with the shock body towards the top, make sure the shock is fully extended. You’ll want to then remove the Hyperscrew to release the nitrogen in the shock, then compress the shock to make sure all the gas is removed. After extending the shock back out, flip the shock over so the shock body side is now in the vice.
Around the shaft, you’ll notice a small snap ring that will need to be removed so that you can remove the gland retaining ring. This retaining ring looks like a steel washer. Pro-tip here: Use a binder clip to hold this washer up and out of the way.
On the inside of the shock body, you’ll notice another Hyperscrew in the gland. Slowly remove it. If the floating piston O-ring has failed, nitrogen gas will be mixed with the oil, and oil can shoot out of the Hyperscrew port. With your fingers, push the gland down into the body of the shock roughly ½”, then remove the snap ring that keeps the gland in place.
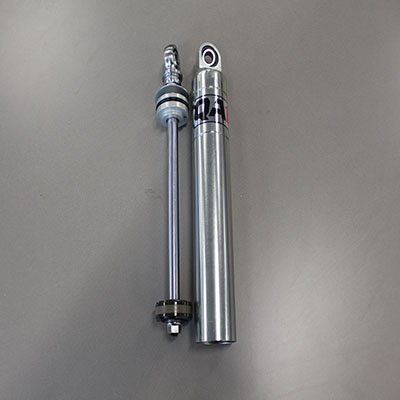
With firm pressure, pull up on the entire piston rod assembly while rocking back and forth to remove it from the shock body.
Now you can change out the valving, replace seals or do any other upgrades that might be necessary. Pour the oil out of the shock body and use new oil when reassembling, or reuse the oil if it’s new.
Assembly
Before starting assembly, you’ll want to reset the floating piston. This is accomplished by taking a section of pipe or the end of a hammer and pushing down the bottom on the inside of the shock body. This piston will slide down about an inch and you’ll hear the air push out around it.
The next step is to pour in a specific amount of oil. In the case of the 7” shock in this video, it’s 320ml of oil. If you are working on a 9” shock, the oil volume is 400ml. For oil volume requirements, please consult the TK08 monotube tuning guide and tech manual.
With the body of the shock filled with its correct amount of oil, slide the piston assembly into the shock body just until the piston is submerged into the oil. Then, slide the gland assembly down into the shock body until it's roughly ⅜” below the large snap ring groove on the inside of the shock body.
You’ll want to push the piston down until fluid fills up on top of the gland to the small snap ring groove on the gland itself. Go ahead and install the screw back into the gland body. With the screw back in, tip the shock over and dump out the small amount of oil that’s on top of the gland.
Slide the gland retaining ring back down and install the snap clip to hold it in place. Flip the shock back over and install the hyper screw on the bottom. The best way is to install the screw all the way in, then back it out two revolutions.
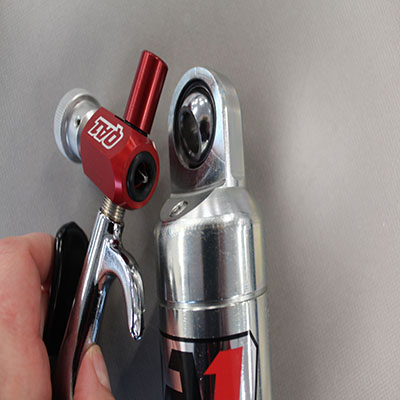
In order to charge the shocks with nitrogen, you’ll need the QA1 refill tool. In essence, this tool allows you to fill the shock and tighten down the screw at the same time. In order to use it, you’ll slide the tool into the bearing mount on the shock, then push the tool down onto the shock body over the Hyperscrew. With the tool being pressed down over the Hyperscrew, use the tool to loosen the screw a tiny bit more. Then fill the shock with nitrogen, and tighten down the Hyperscrew before removing the fill tool.
To make sure the shock is properly rebuilt, slide the travel indicator on the piston shaft up, then compress the shock all the way down. It should return to fully extended on its own. If the shock does not fully compress, there is either too much or too little oil. If there is too much, the gland Hyperscrew can be loosened and a small amount of oil bled out. If there is too little, the reassembly process needs to start over, including resetting the floating piston.
If you have any questions, please feel free to give us a ring at (952) 985-5675 or shoot us an email.