How to Install C10 Front Suspension Systems
1963-1987 C10 Front Suspension Install
If you own an old Chevy or GMC truck, you know that it rides like an old truck. We want to show you how to upgrade the front suspension on your 1963-1987 C10 to modern tubular suspension with coil-overs. This suspension will drastically change the ride quality of your truck. Another bonus of the coil-overs besides the improved ride the valving gives you is the ability to easily adjust the ride height to your exact preference.
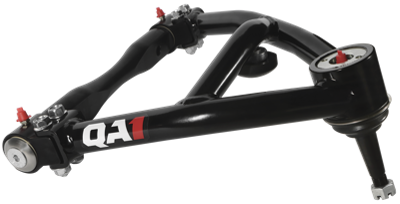
Watch as we complete the front end swap on the floor with basic hand tools, just like you’d be doing at home. The kit comes with a front sway bar, tubular upper and lower control arms and a coil-over shock and bracket.
Remember, this is video 1 of 3, discussing the front suspension only. We are going to be upgrading the rear suspension as well!
Removing the Old Components
The process of uninstallation is fairly straightforward. We started by jacking the front end up and removing the front wheels. Now this suspension is a really basic dual A-Arm type suspension and with the shocks remote mounted it’s almost easier to disassemble than other suspension.
We started disassembling the suspension by removing the tie rods from the spindle. Since we were going to upgrade to disc brakes as well, we went ahead and disconnected the brake lines along with the shocks. We also removed the sway bar from the control arms and frame.
The next step was to remove the spindle and coil springs. We started by removing the cotter pins and backing the castle nuts halfway off. With the coil spring keeping pressure, we smacked the spindle at the ball joints with a sledge hammer to break them loose from the spindle. With both broken loose, we put a floor jack under the lower arm to hold some pressure while we removed the spindle.
Then we lowered the lower control arm and removed the coil spring – be careful here, as these can be under a lot of tension and can pop out, causing harm.
Both control arms will need to be unbolted and removed. The top is held in with two bolts while the bottom is held in with two U-bolts.
Bracket Removal
The last part of this step requires removing a few rivets and cutting a hole for the coil-over to pass through. Don’t worry, we show you a few techniques to make this easy.
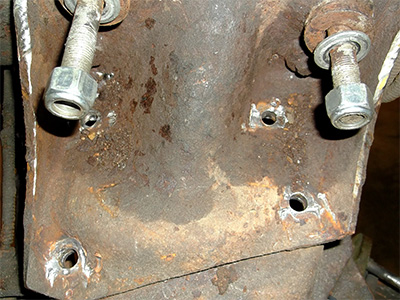
On top of the coil spring pocket is an “L”-shaped bracket. This bracket joins the crossmember to the frame and has to be removed in order to install the coil-over shocks. On the vertical frame side, there are four bolts that hold it to the frame. On the horizontal crossmember side, there are four rivets that have to be removed.
You can remove the rivets however it is easiest for you. We took a die grinder with a cut-off wheel, cut an “X” into the top, and popped the top off before driving them out. One thing to note here is that grease and dirt love to sit on this bracket, and you might not see these rivets. Clean out this bracket and you will see them.
Once you have this bracket out of the way, the very last step is to cut a hole in the crossmember for the coil-over to come through.
In order to get the hole, we set the new bracket in place and traced out the hole. We used a torch to cut, but you could use a drill, die grinder, plasma cutter, etc. – whatever is available and works best for you.
Installation
Our very first step was to get the coil-over bracket bolted in place. One thing to note is these are left and right specific, so be sure to have the correct one on each side. Remember too that these are old trucks that saw lots of miles and weren’t perfect from the factory. It’s very possible that when bolting in this bracket you’ll have to run a drill through some of the holes due to misalignment. This is normal and not a concern.
Before bolting in the lower control arms, take a careful look at the saddles that the cross shaft sits in. There’s an alignment dowel that should be there. If it’s not, you’ll want to get that fixed before moving on.

Bolting On The Arms
Go ahead and bolt on the lower arms, making sure to keep the arm aligned with the dowels on the frame. The U-bolts that hold these arms on need to be tightened down evenly – if not, they could fail over time.
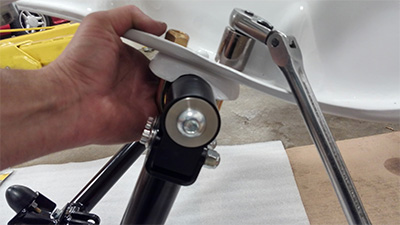
From here, install the upper arms with the provided hardware and assemble the coil-over springs. We had the coil spring adjusters all the way down at their lowest setting, which is where the truck sits the lowest; that made it easier for installation.
With the arms in place and the coil spring in place, we installed our new spindles with disc brakes, tightened down the castle nuts and installed cotter pins.
This truck had a factory sway bar, so we already had the mounts to bolt up the new sway bar; however, some trucks didn’t come with a sway bar. The solution there is to bolt the sway bar to the lower control arms with the sway bar end links, then hold the sway bar to the frame with the brackets attached. The brackets will match the frame where it’s supposed to be; this way, you can drill holes and attach the sway bar.
With everything installed, we bled the brakes, installed the wheels and set it down on the ground. At this point we didn’t dial in the suspension and ride height quite yet as we wanted to get the rear suspension installed before getting our ride height and alignment done.
Time to upgrade the rear suspension to match the front suspension. Be sure to tune into the next video!
If you have any questions, please feel free to give us a ring at (952) 985-5675 or shoot us an email.